Getting Started in 5 Steps
Click "+ Add subject" at the bottom of the left sidebar. Give it a clear name and pick a colour. One subject, one page. You can promote topics to their own sub-pages later when they grow complex enough to need it.
Click "+ Add topic" in the Topic Board header. Do not organise yet. Get everything out of your head first. Once they are all visible, drag cards into Core, Important Detail, or Additional Details. Then Ctrl+click two cards to draw a connection between them and describe the relationship.
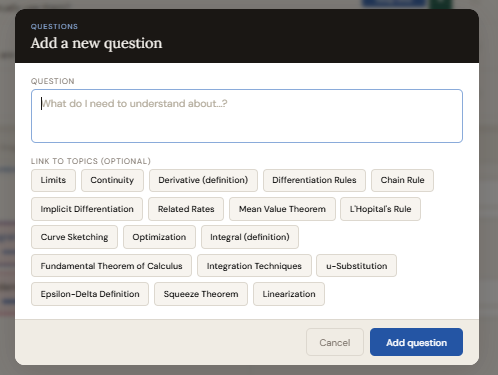
Click "+ Add question" in the Questions header. Write the question, then click topic names to link it to them. Every question starts at Unknown.
Click any stage dot on a question row to set its stage. Hover any question row and click the THINKNOTES button to open a full-screen ThinkNotes editor for that question, or click the THINK button to open the full-screen depth check panel. When something blocks you, use the "Feeling Blocked?" section at the bottom of the Think panel to mark the question as stuck. Add activities, mistakes, and quiz questions as you go.
Hover any question row and click the THINK button. It shows all six depth check sections as full rich-text editor cards. Write in any section and tick its checkbox. Once two depth sections are ticked, the Upgrade button unlocks at the bottom of the panel, letting you move the question to "I Can Use It".
Do not wait until the Topic Board is perfectly organised before adding questions. Do not wait until all questions are in before starting to study. Structure emerges from use, not from planning.
The goal is not a perfectly filled app. The goal is knowledge you can actually use.
What is this app?
Most people learn by collecting notes, watching videos, and hoping things stick. The problem is not effort, it is structure. Without structure, learning feels productive but results in shallow retention and isolated knowledge that cannot be applied when it matters.
This app gives your learning a system. It helps you capture what you are trying to understand, organise it into meaningful topics, track how well you actually know each thing, and then deeply interrogate that knowledge until it becomes genuinely yours.
It works for any complex subject. Theoretical topics like calculus, procedural topics like Python programming, or anything in between.
The core insight: Most people confuse exposure with understanding. Seeing information once, even understanding it in the moment, is not the same as owning it. This app forces the gap between those two things into view, and gives you the tools to close it.
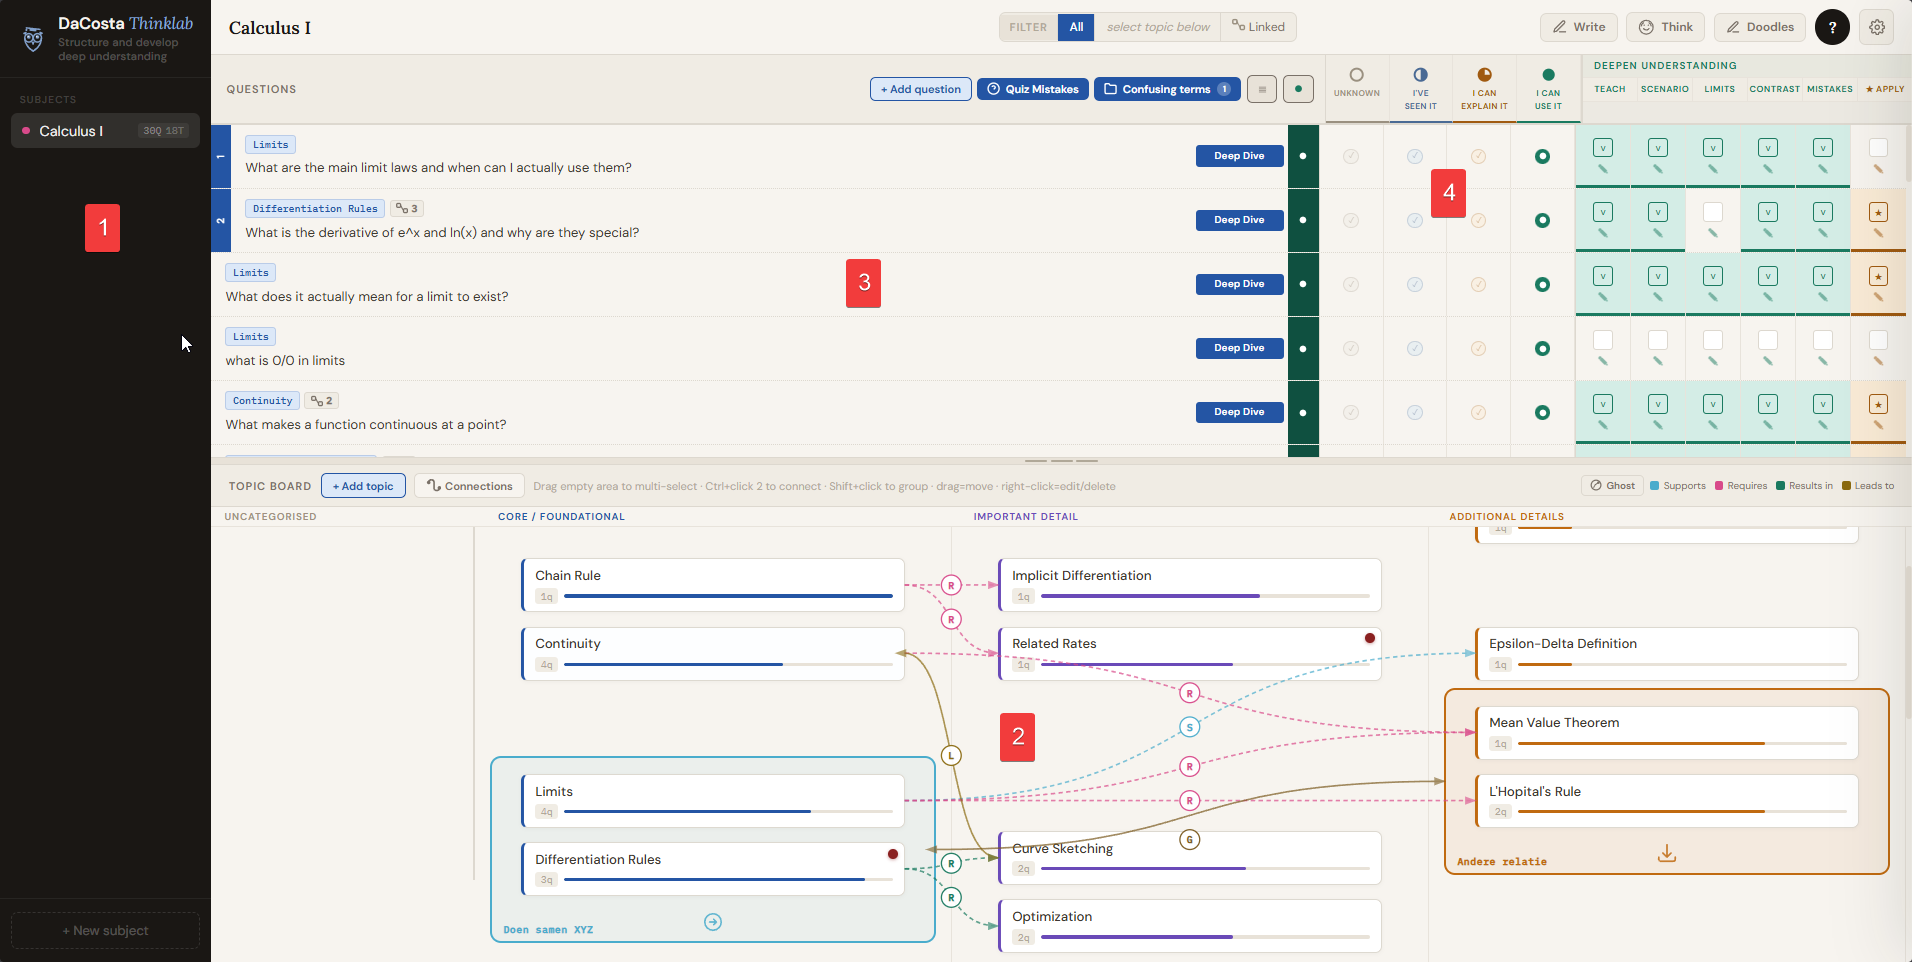
The Layout
The app is organised into one page per subject. Each page has three sections arranged in an L-shape:
You can drag the horizontal divider between the Questions section and the Topic Board up or down to give more screen space to whichever you are using.
The Topic Board
The Topic Board is where you build the structure of your knowledge. A topic is anything you need to learn: a concept, a technique, a tool, a term. Topics do not need to be understood yet. They just need to exist so nothing gets lost.
Adding topics
Click "+ Add topic" in the Topic Board header. A modal appears with the following fields. The name is required; everything else is optional.
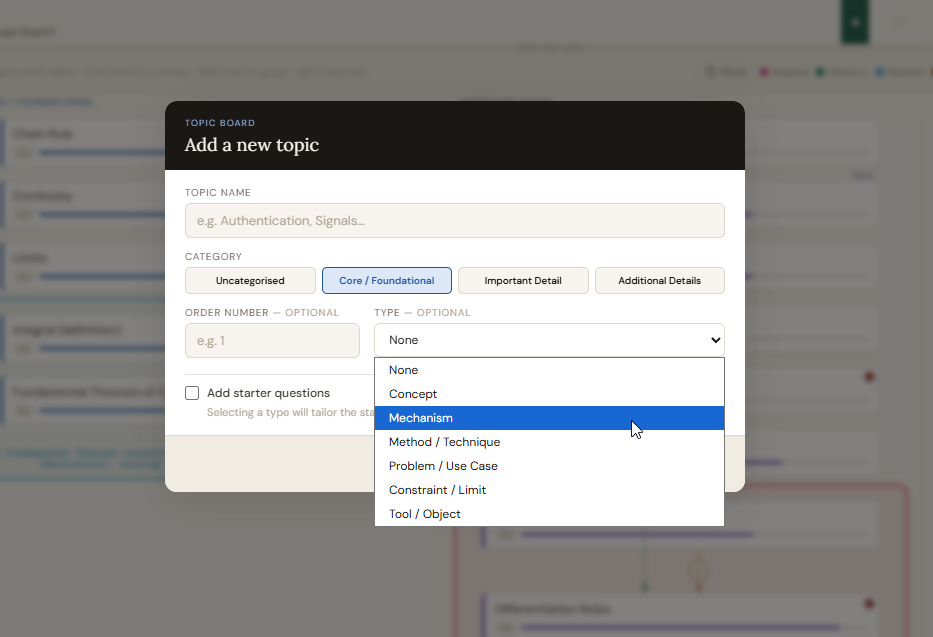
Right-click any card at any time to edit its name, type, number, or to retire it. Retired topics are hidden but not deleted; a toggle in the Topic Board header reveals them.
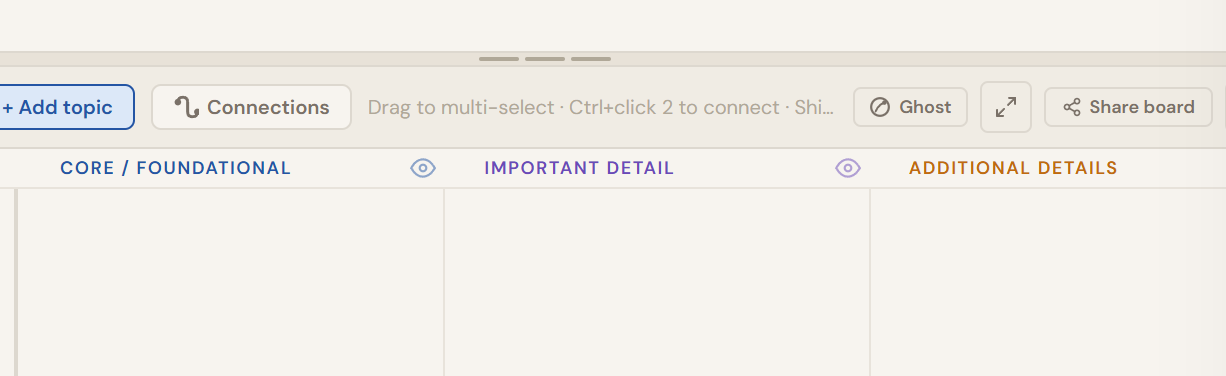
The four columns
Drag any topic card left or right to move it between columns. The columns are not labels you assign once. They should reflect your current understanding of the subject and you should update them as that understanding deepens.
To reorder cards within a column, drag them up or down. To move multiple cards at once, click and drag across empty column space to draw a selection rectangle, then drag any selected card and the rest follow. Right-click a column header to rename it if the default label does not fit your subject.
What a topic card shows
Each card gives you live information about that topic's state without opening anything.
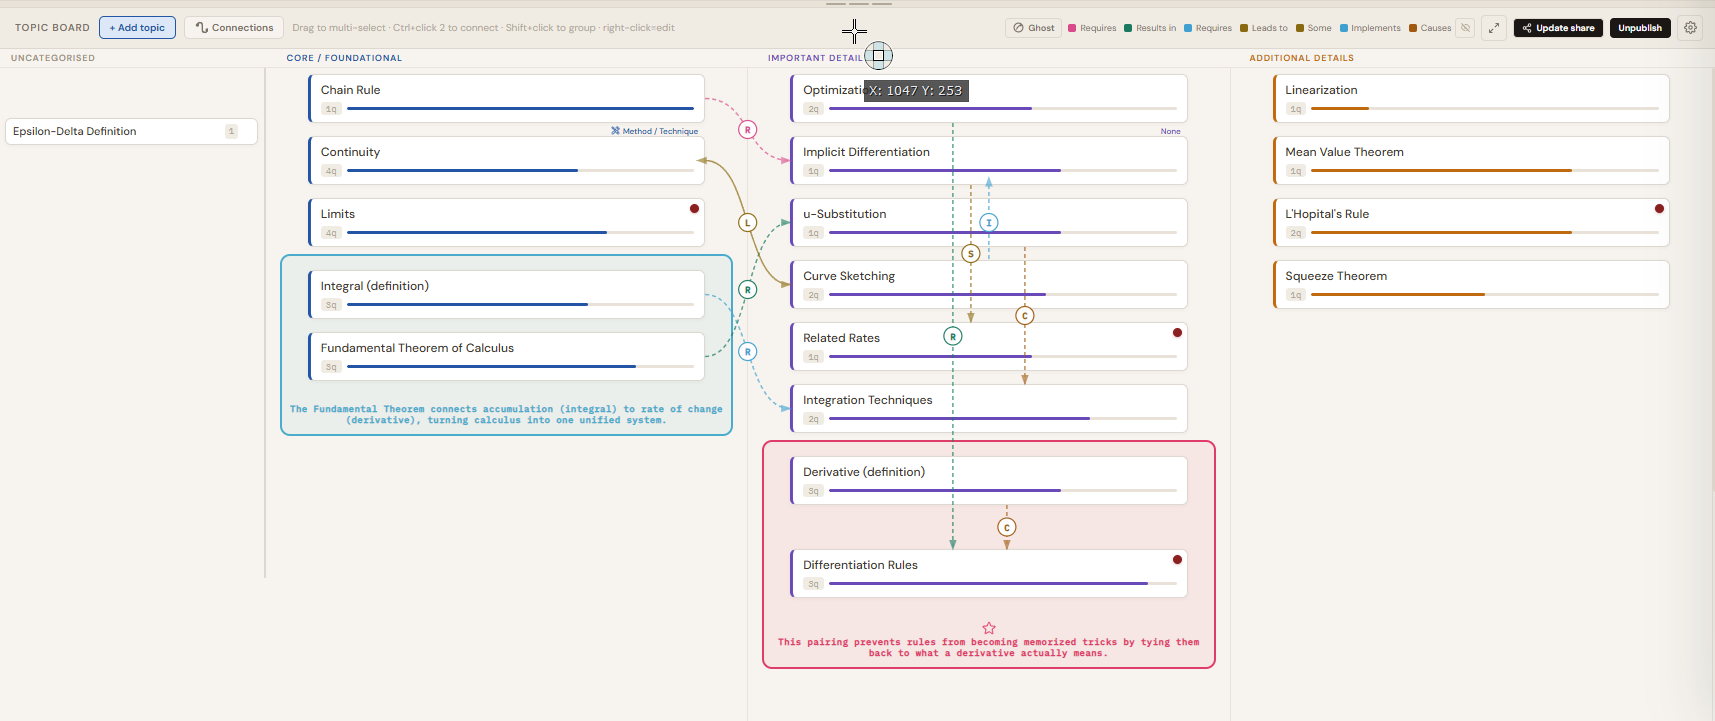
Drawing connections between topics
Ctrl+click the first card, then Ctrl+click the second. A bar appears at the top of the Topic Board showing both card names.

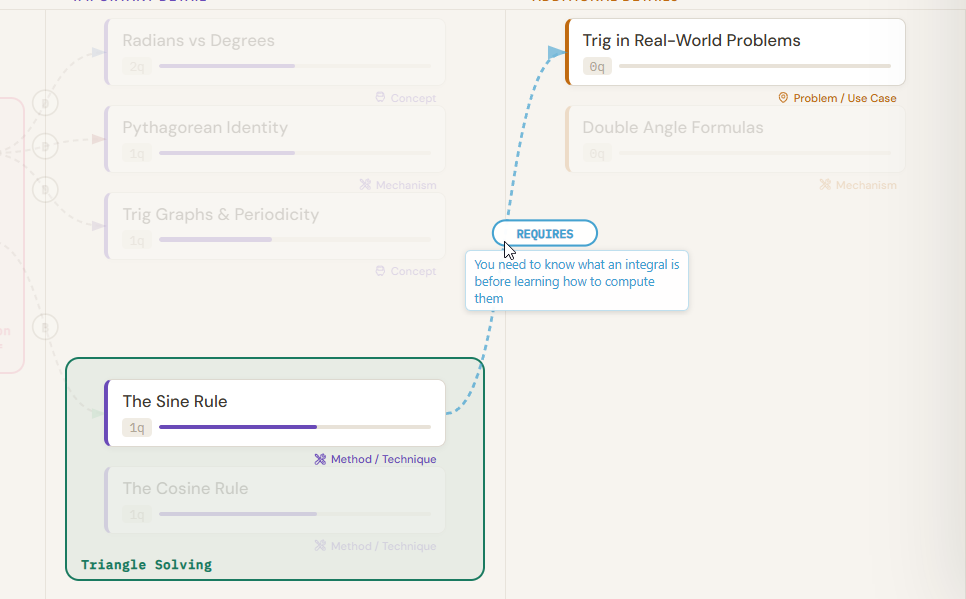
Open the dropdown and select a relationship type such as Requires, Leads to, Extends, or Causes. Then type a one-sentence description of the specific relationship in the text field. Click "Add connection". A curved arrow appears between the two cards, colour-coded by its relationship type, with the first letter of the label on the curve. Hover over any arrow to read the full sentence in the header bar.
To create a custom connection type, select "+ Custom..." from the dropdown. A small modal opens where you define the label and colour. That type is then available for all future connections in this subject.
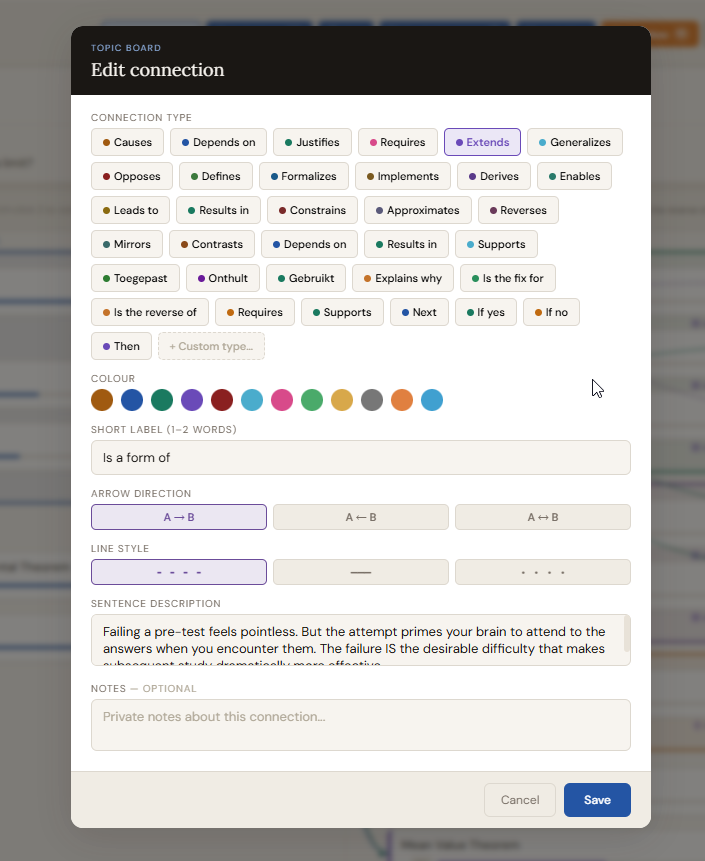
To edit or delete an existing connection, click "Connections" in the Topic Board header to open the Connection Manager. Every connection is listed with its two endpoints. Each row has a type dropdown (select from all defined connection types including custom ones, or add a new custom type via the "+ Custom..." option), an editable short label, an editable sentence, a colour picker, and a line style selector. Click the X on any row to delete the connection. Changes save immediately.
Grouping topics
Shift+click two or more cards that are adjacent in the same column. A bar appears at the top of the Topic Board showing the count selected and whether they are contiguous. Cards must be adjacent; the bar shows a warning if they are not. Once "Ready to group" appears, click the "Group" button in the bar. A modal opens where you type the group name, pick a colour, and optionally choose an icon. Click "Create group". The selected cards get a shared coloured border and a named label at the bottom of the group box.
To move a group to a different position in its column, drag the group label area up or down. The entire group moves as a unit and other cards slide to make room. To delete a group, right-click the group label area and select the delete option.

You can connect Cards to each other as well as entire groups to each other.
Promoting a topic to its own subject
Right-click any topic card and select "Promote to subject". A new subject is created named after that topic and linked to the original card. The card stays on the parent board with a badge showing the linked subject's name. Click that badge to navigate to the new subject. Use this when a single topic grows complex enough to need its own full Topic Board and Questions section.
Questions
Every question you have about your subject lives here. Each question tracks one thing: how well you actually understand the answer right now. The stage is yours to set, and you move it forward only when your understanding genuinely shifts.
Adding questions
Click "+ Add question" in the Questions header. A modal opens. Type your question in the text area, then click topic names below to link the question to them. You can link one question to multiple topics. Click "Add question" to confirm. The question appears in the list at the Unknown stage.
If no topics apply yet, leave the list empty. Unlinked questions collect in a separate "Unlinked" group at the bottom of the Questions section. To link a question later, right-click it and select "Edit question". The same modal reopens with all fields editable.
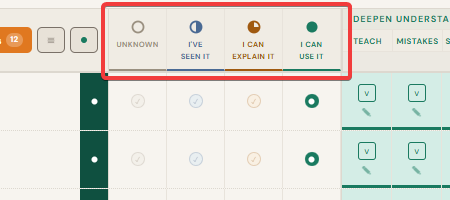
The four stages
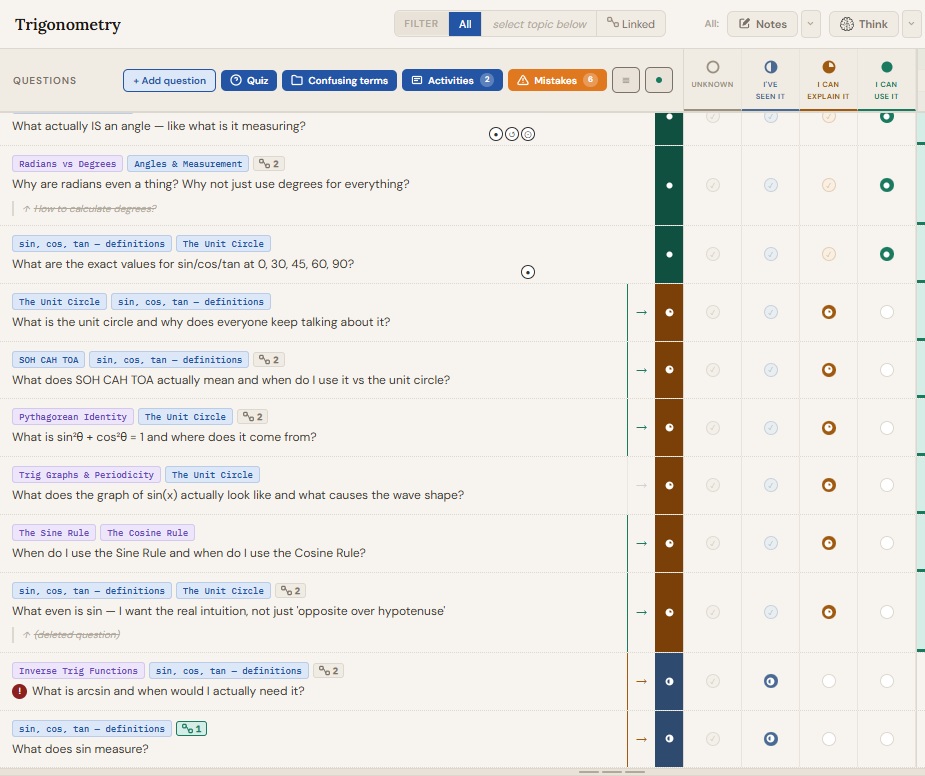
Each question row shows four stage dots on the right side. The filled dot is the current stage. Click any dot to jump directly to that stage. The stages are intentionally honest.
Per-question ThinkNotes and Think buttons
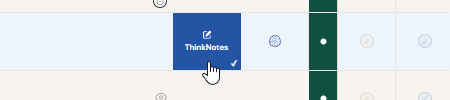
Every question row has two hover-reveal buttons: THINKNOTES and THINK. They are hidden by default and appear when you hover the question row, showing a pale blue left-edge border. Hovering directly over a button darkens it to solid blue.
ThinkNotes ✓ indicator: If you have written any ThinkNotes for a question, a small ✓ shows up at the far right of the question row. This lets you scan the question list and instantly spot which questions have something written without opening anything.
Margin pin icons: If a question's ThinkNotes editor has margin pins saved, small circle icons show up just to the left of the THINKNOTES button area on that question row. Each unique pin type shows once as a small black-bordered circle with its icon. Hovering shows a tooltip confirming that pin type is used in the ThinkNotes. This lets you see at a glance which questions have important points marked without opening them.
Clicking THINKNOTES opens a full-screen overlay for that specific question's ThinkNotes, with a rich-text editor, a Sources section, and a "Switch to Think" button. Clicking THINK opens a full-screen overlay for that question's depth checks, showing all six sections as rich-text editor cards plus the Mistakes list, Apply checkboxes, and the "Feeling Blocked?" section. The top-bar THINKNOTES and THINK buttons are different: they open a scrollable accordion covering the right side of the screen, showing all topic questions together.
Filtering, sorting, and view options
Click any topic card in the Topic Board below to select it. Then toggle the filter button at the top of the Questions header to show only questions linked to that topic. Click the filter button again to return to all questions.
Click the hamburger menu in the Questions header to reveal additional controls: sort by stage, alphabetically, or by newest first. Switch to a compact "thin" view that shows more questions on screen with less detail per row. Pinned questions always stay at the top regardless of sort order. Right-click any question and select "Pin question" to pin it; right-click again to unpin.
The filter controls are automatically hidden when ThinkNotes focus mode or Think focus mode is active, keeping the focus view clean.
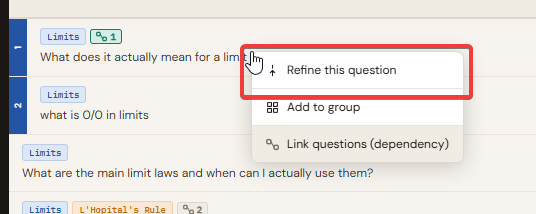
Question evolution: merging one question into another
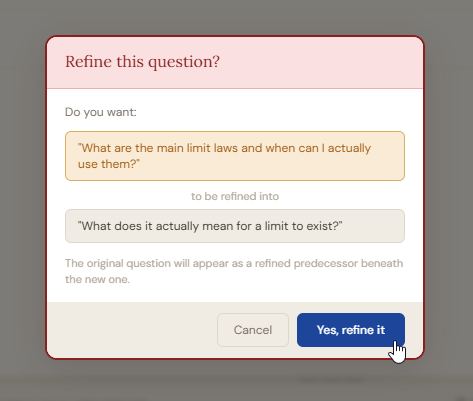
As you study, a vague early question often becomes obsolete once a sharper one replaces it. To absorb the old question into the new one, drag the older question by its row and drop it directly on top of the newer, sharper question. A confirmation modal appears showing both questions. Confirm the merge. The old question disappears from the main list. Its text is preserved inside the new question as a strikethrough line with a small arrow indicator showing it is a predecessor. To restore it as an independent question, right-click the strikethrough line and select the restore option.
Example: "How do I get the selected object in Cinema 4D?" becomes obsolete once you learn there are two methods. Drag it onto "When do I use GetActiveObject() vs GetActiveObjects()?" and the original is preserved as a strikethrough ancestor inside the sharper question.
Dependency chains
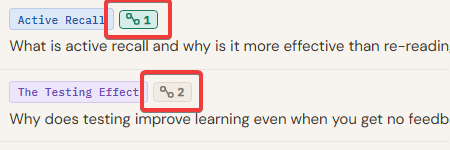
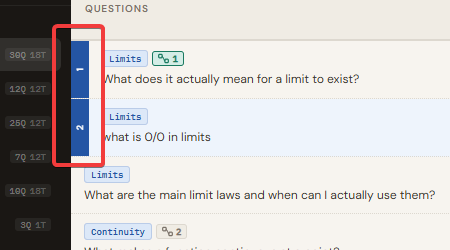
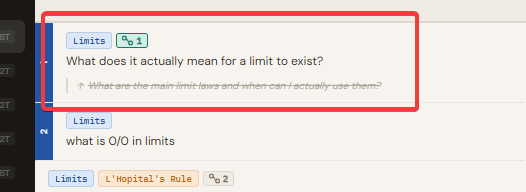
If one question cannot be understood until another is clear, you can link them into a dependency chain. Drag one question and drop it on another. A menu appears with the option "Link questions (dependency)". Click it to create the link. Both questions then show a small chain badge on their rows: a green chain icon marks the root question (learn this first), and numbered badges show the order in the chain.
Dependencies are also visible in the per-row ThinkNotes panel. At the top of the ThinkNotes, a "DEPENDS ON" section shows the prerequisite question (clickable), and a "REQUIRED BY" section shows any questions that depend on this one. Click the X next to either to remove the link.
You can also set dependencies via the JSON import format by adding a
The Stuck indicator
If a question is genuinely blocking you, hover the question row and click theThinkNotes or THINK button to open its full-screen panel.

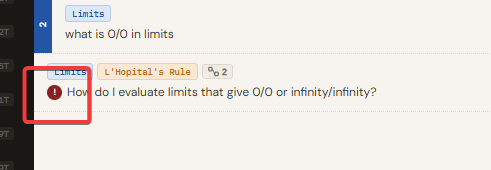
The "Feeling Blocked?" section is at the bottom of that panel. Three options appear: Missing Something (you lack a prerequisite or resource), I Don't Get It (it makes no sense yet), or Not Confident Using It (you understand it but would probably apply it wrong). Click the one that matches. A red dot appears on the question row and on the parent topic card. Click the active option again to clear it.
Preview panels (▼ buttons)

Each of the three mode buttons in the Questions header bar (THINKNOTES, THINK, and DOODLE) has a small ▼ arrow button beside it. Clicking ▼ opens a read-only preview overlay that replaces the six depth-check columns on the right side of the question list. The overlay stays pinned to the right of the visible screen area regardless of scroll position.
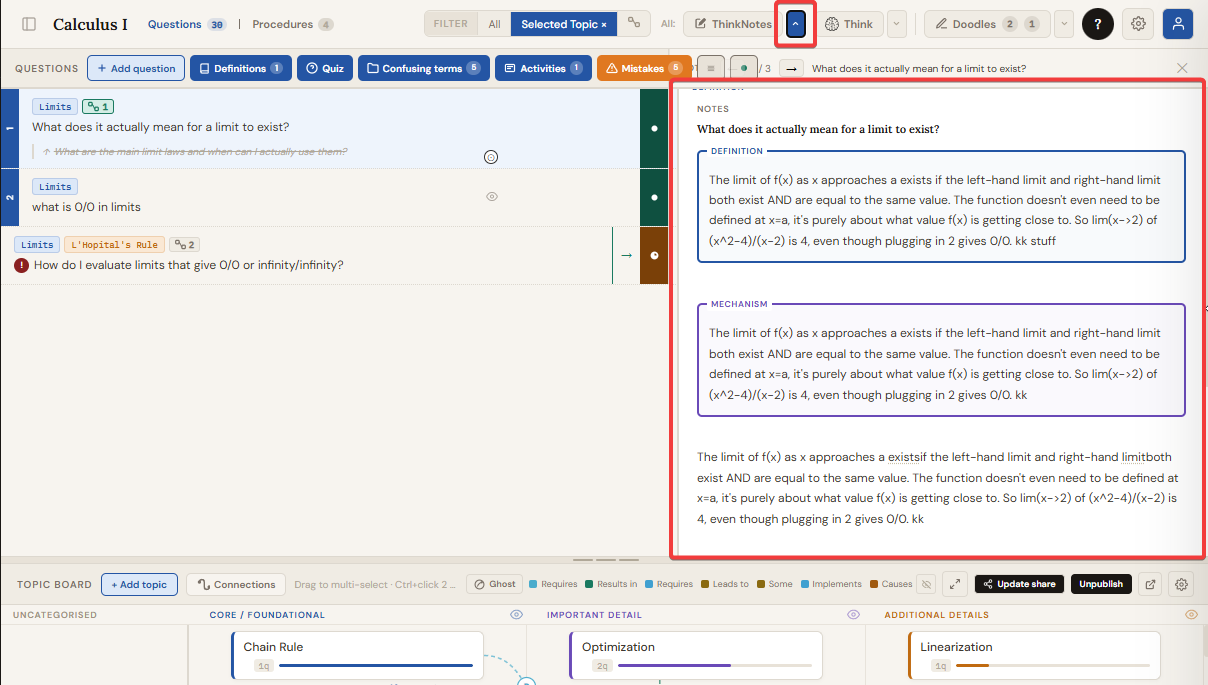
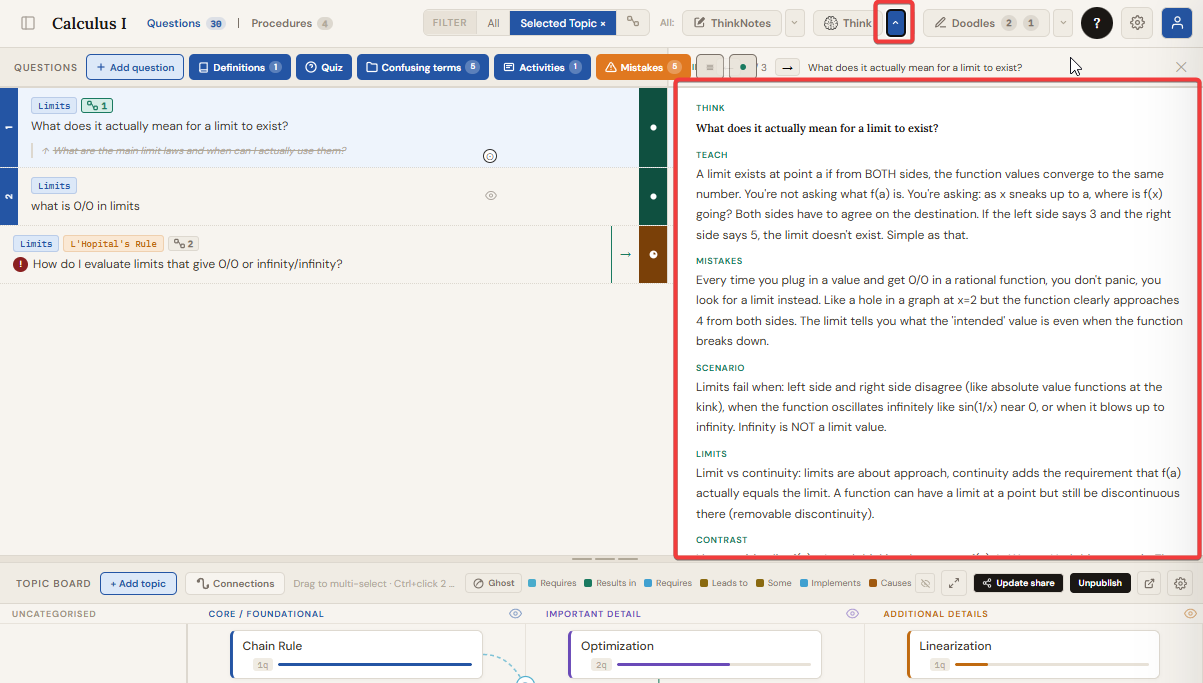
Navigation: A header bar above the preview shows arrow buttons with the current question index (e.g. "Q 3 of 14"). Click the arrows or press the Up/Down arrow keys to move between questions. You can also click any question row while a preview is open and the preview immediately switches to that question's content. Only one preview can be open at a time. The DOODLE button and its ▼ arrow are hidden when ThinkNotes or Think focus mode is active.
Quiz
Quiz is a flashcard-style review mode built entirely from questions you log yourself.
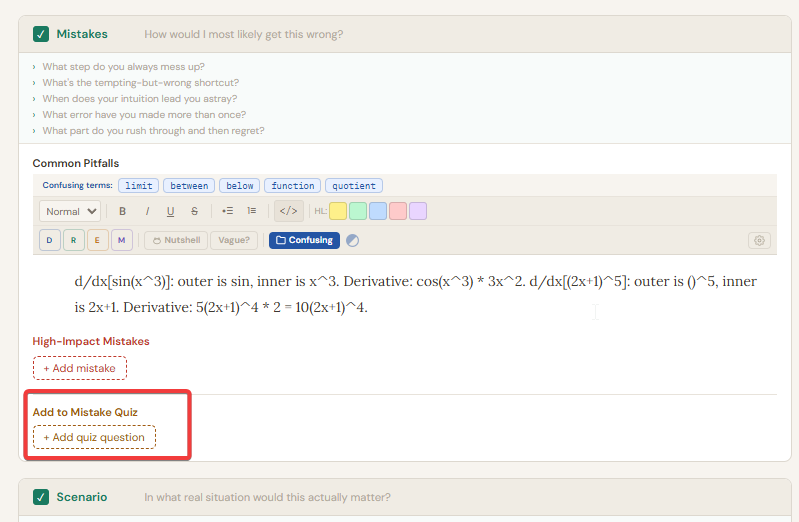
Adding quiz questions from the per-row Think panel: Hover any question row and click THINK. Go to the Mistakes section. Below the High-Impact Mistakes list there is an "Add to Quiz" area. Click "+ Add your question" and type a quiz question designed to catch that mistake again. Each one is stored against the question it came from.
Adding quiz questions directly from the Quiz panel: Click the "Quiz" button in the Questions header. In the panel, click "Manage" to enter manage mode. At the bottom, an "Add Question" form appears. Select which source question the quiz item belongs to from the dropdown, type the quiz question text, and click "+ Add".
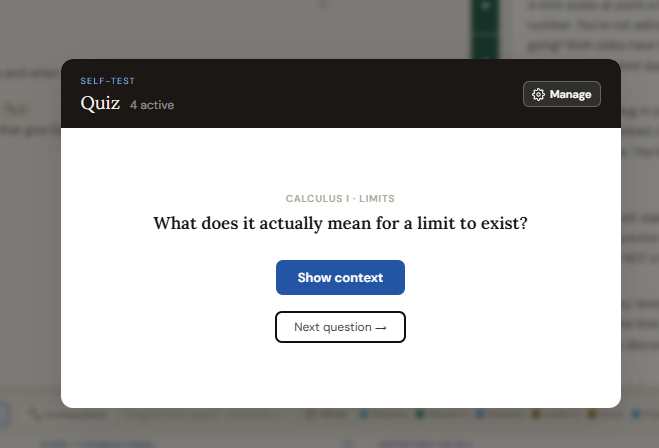
Running the quiz: Click the "Quiz" button. One question appears. Try to answer it mentally. Click "Show context" to reveal the original question it came from. After revealing context, five small confidence spheres appear labelled "How well did I know this?". Click a sphere from 1 to 5 to record your confidence. Clicking the same level again resets it to zero. Click "Next question" to move on.

Managing the quiz: Click "Manage" in the Quiz panel header. A topic filter list with checkboxes lets you remove entire topics from the rotation. An individual question list lets you disable specific quiz questions without deleting them. Click "Done" to return to quiz mode.
Global Mistakes panel
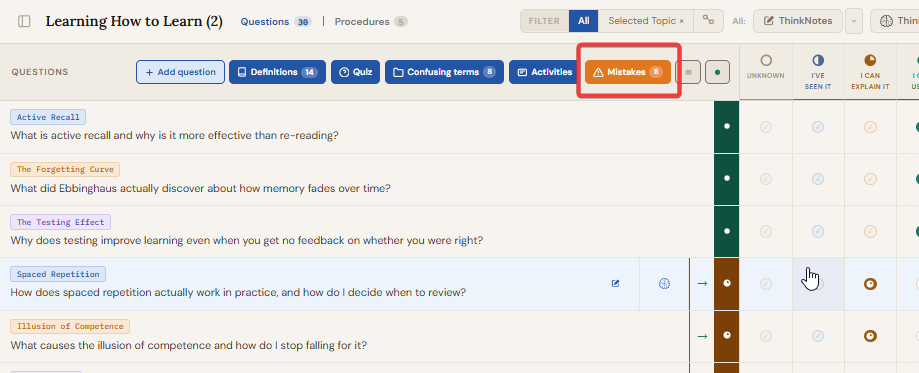
The orange Mistakes button in the Questions header bar shows a live count of all High-Impact Mistakes logged across every question in the current subject. Click it to open the Global Mistakes panel, a full-width modal listing every mistake item from every question.
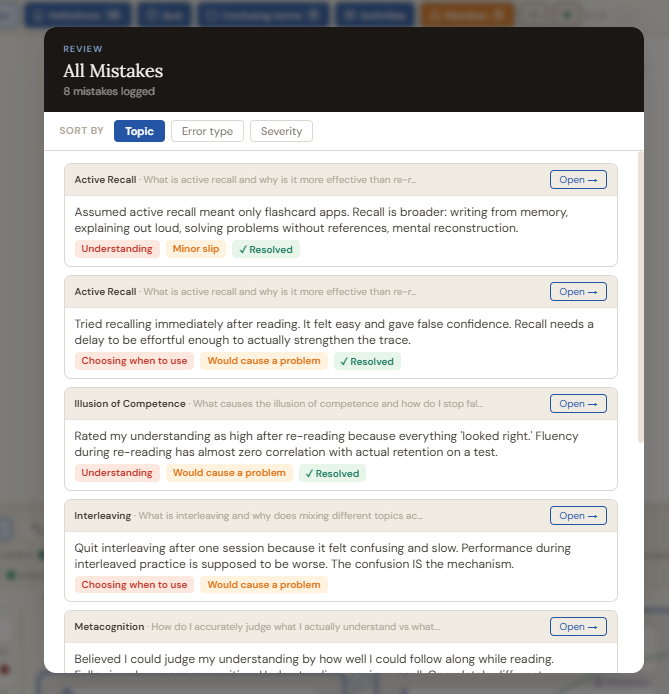
Sort controls at the top let you view all mistakes grouped by topic, by mistake type (Understanding / Choosing when to use / Doing the steps / Attention), or by severity (Minor slip / Would cause a problem). Each mistake entry shows its text, its type and severity badges, and an "Open →" button that opens the full-screen Think panel for that question so you can work on it immediately.
Use the Global Mistakes panel at the start of a study session to triage what needs the most attention across your entire subject before diving into individual questions.
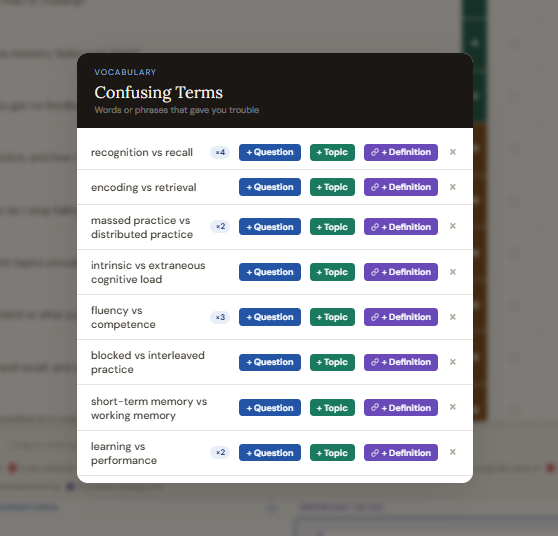
Confusing Terms
Confusing Terms captures words and phrases that keep interrupting your understanding as you write. It is not a glossary you build manually.
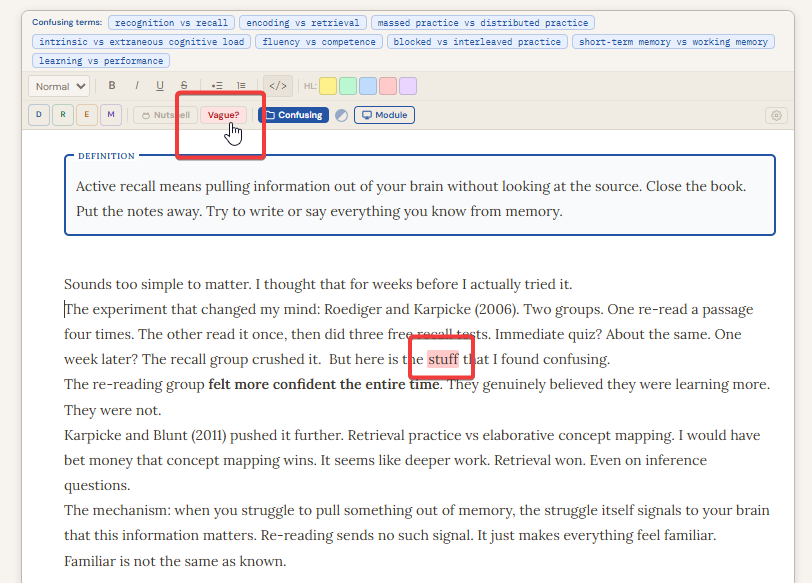
How to add a term: Open any question's ThinkNotes panel. In the rich-text editor, select any word or phrase that confuses you. In the formatting toolbar, click the "Confusing" button. The selected text is saved immediately and a toast notification confirms it. If you flag the same term three or more times, the toast offers a direct shortcut to create a question for it.
Highlighting inside the editor: Click the sphere icon (a half-blue diagonal circle) next to the "Confusing" button in the toolbar to toggle confusing term highlighting. When active, every saved confusing term in the current subject is highlighted inside the editor as you write, reminding you to spot those words as they show up in your ThinkNotes.
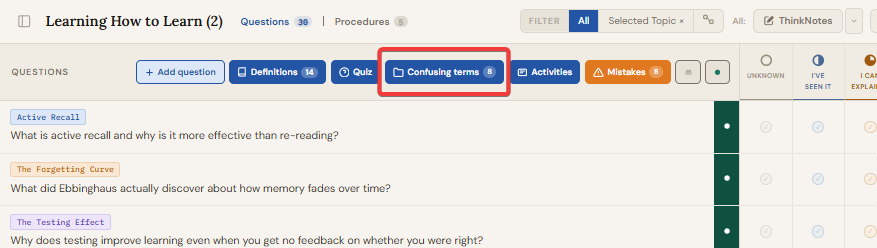
Viewing and acting on terms: Click the "Confusing terms" button in the Questions header (it shows a count badge when terms exist). The drawer opens listing every saved term. Terms flagged more than once show a count badge. Each term has three action buttons: "+ Question" opens the add question modal, "+ Topic" opens the add topic modal, and the X button deletes the term.
Test Your Understanding
Reaching "I Can Explain It" means you can describe the answer. That is not the same as owning it. Owning it means knowing when to use it, where it fails, what mistakes you are likely to make, and whether you have actually applied it in the real world. The six depth checks close that gap.
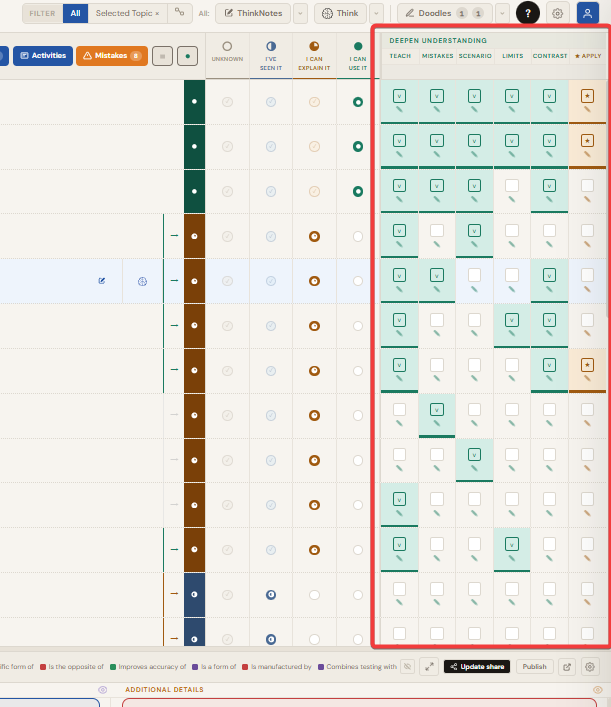
The checks live in two places. The six depth columns on every question row let you tick checks at a glance across your entire question list. The per-row Think panel gives you a full rich-text writing space for each check. Both update the same state.
Using the depth columns on the question row
Each question row has six small square cells on the far right, one per check. Click any cell to tick it. A ticked cell turns teal (amber for Apply). Click it again to untick. To write a note for a check without opening the full Think panel, hover over any cell and click the small pencil icon that appears. A compact note panel slides up from the bottom of the screen with the prompt for that check visible above a rich-text editor. Write your notes and close the panel. The note is saved against that specific check for that question.
Using the per-row Think panel
Hover any question row and click the THINK button to open the full-screen Think panel for that question. It shows all six depth check sections as full rich-text editor cards, each with a prompt and a checkbox. The editors support the same DREM block labels, vague word highlights, confusing term highlights, right-click context menu, and margin pins as the main ThinkNotes editor. You can also right-click selected text in any depth check editor to add it as an activity. Tick a section's checkbox to mark it complete. Click "Switch to ThinkNotes" in the panel header to jump to that question's ThinkNotes editor. The "Upgrade" button at the bottom advances the question to the next stage and is locked until at least two checks are ticked.
My current understanding (ThinkNotes editor)
ThinkNotes is the app's own text editor, built specifically for learning. It is not a generic notes app. It is designed to help you think through what you know, catch weak spots in your understanding, and connect your writing to the rest of your study system. It shows up in the per-row full-screen ThinkNotes panel and in the top-bar ThinkNotes accordion mode.

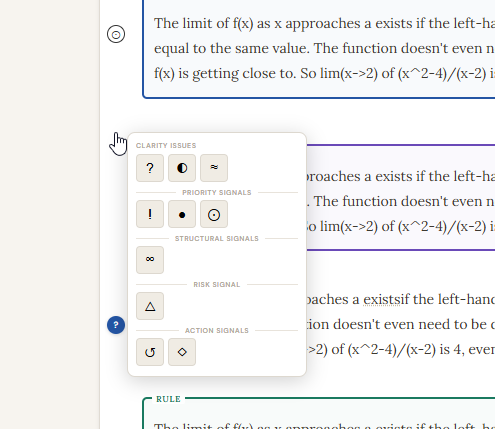
The pins are:
Clarity issues:
? Don't fully understand yet, ◐ Partially clear / fragile, ≈ Approximation / simplified ·
Priority signals:
! Important / high leverage, ● Core point, ⊙ Insight / breakthrough ·
Structural signals:
∞ Connects strongly to another idea ·
Risk signal:
△ Easy to misuse ·
Action signals:
↺ Revisit later, ◇ Needs example / test
The six depth checks
In the per-row full-screen Think panel, each depth check appears as a full rich-text editor card with a prompt above it. The editors support the same features as the ThinkNotes editor: DREM labels, vague word highlights, confusing term highlights, right-click menu (including "Add as activity"), and margin pins.
The Upgrade button and stage gate
At the bottom of the per-row full-screen Think panel is an Upgrade button that moves the question to the next stage. It is locked until at least two depth checks are complete. If you have High-Impact Mistakes logged that are not yet marked as resolved, the app shows a modal before advancing. It lists the unresolved mistakes and asks whether you are past them. You can confirm and advance anyway, or go back and resolve them first.
Focus Modes
The app has two sets of writing and review modes. The top-bar modes (THINKNOTES, THINK, DOODLE buttons in the header) cover the right side of the screen with an accordion or overlay showing all topic questions. The per-row modes (THINKNOTES and THINK buttons visible on hover over any question row) open a full-screen panel covering the entire screen for one specific question.
While ThinkNotes or Think top-bar mode is active, the Doodle button and its ▼ arrow are hidden. Only one top-bar mode can be active at a time. Per-row panels overlay everything and are closed with the X in the panel header.
Top-bar ThinkNotes mode
Clicking THINKNOTES in the Questions header opens a scrollable overlay covering the right side of the screen. All questions linked to the current topic show up as expandable accordion cards. Expand any card to open its ThinkNotes editor. The header shows a "Show sources" toggle, a Download button to export your ThinkNotes, and a "One at a time" toggle that collapses all other question cards to keep only the active one expanded. To exit, click the THINKNOTES button again or press Escape.
Per-row ThinkNotes panel (full-screen)
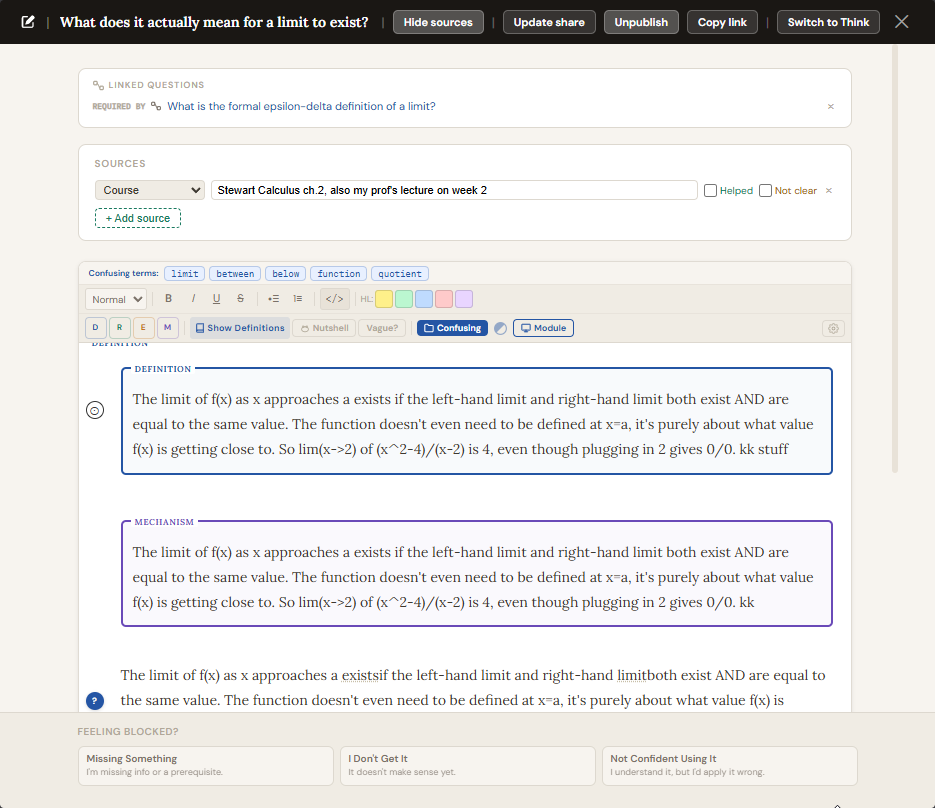
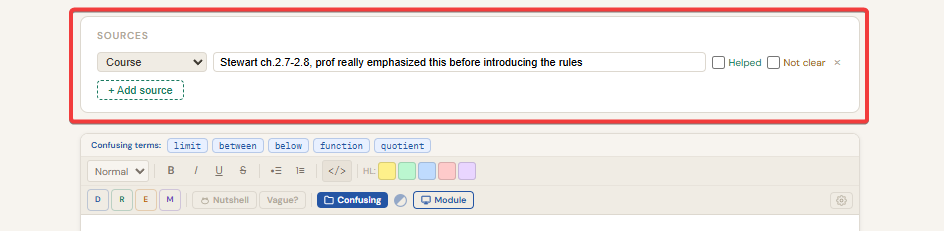
Hover any question row and click the THINKNOTES button to open a full-screen ThinkNotes panel for that specific question. The panel covers the entire screen and shows the ThinkNotes editor in a clean white card. The "Sources" button in the panel header toggles the Sources section above the editor, where you can add, edit, and delete references with type tags and Helped / Not Clear checkboxes. Click "Switch to Think" in the header to jump to the Think panel for the same question. Close the panel with the X.
Top-bar Think mode
Clicking THINK in the Questions header opens a scrollable overlay covering the right side of the screen. All questions for the current topic appear as expandable cards. Expand any card to see its six depth check sections. The header shows a "Show hints" toggle for the depth check prompts. To exit, click THINK again or press Escape.
Per-row Think panel (full-screen)
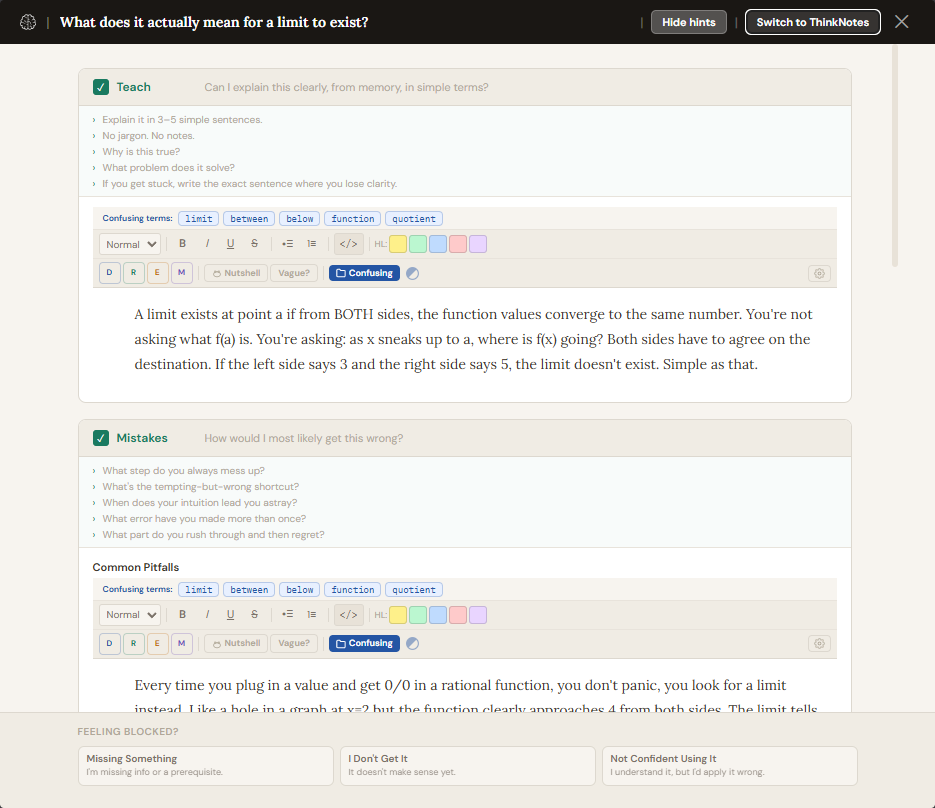
Hover any question row and click the THINK button to open a full-screen Think panel for that specific question. It covers the entire screen and shows all six depth check sections as full rich-text editor cards (Teach, Mistakes, Scenario, Limits, Contrast, Apply), ordered top to bottom. Each card has a prompt, a full rich-text editor, and a completion checkbox.
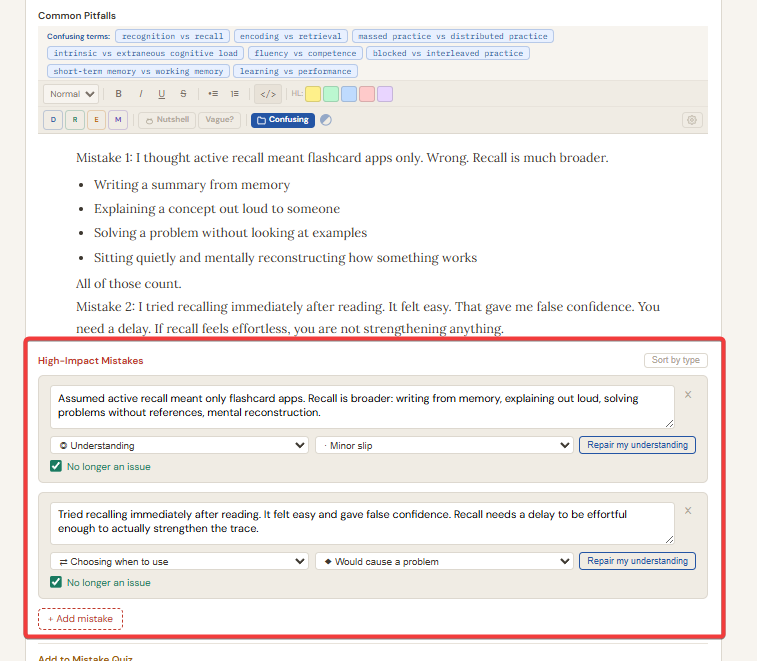
The Mistakes card shows a "Common Pitfalls" editor at the top and a High-Impact Mistakes list below it. Add mistakes with "+ Add mistake". Each mistake has a text field, a type dropdown (◎ Understanding / ⇄ Choosing when to use / ▶ Doing the steps / △ Attention), a severity dropdown (· Minor slip / ◆ Would cause a problem), a "Repair my understanding" button, and a "No longer an issue" checkbox. Use the sort toggle to view mistakes grouped by type. At the bottom of the Mistakes card, an "Add to Quiz" section lets you add quiz questions linked to that mistake.
The Apply card shows three sub-checkboxes: "Used to solve a real problem", "Tested on a concrete example", and "Used to make a decision". Ticking any one automatically marks the Apply check as complete and turns the cell amber.
At the bottom of the panel, the "Feeling Blocked?" section has three buttons: Missing Something, I Don't Get It, and Not Confident Using It. Click one to mark the question as stuck. Click it again to clear it. The Upgrade button advances the question to the next stage once two depth checks are complete. Click "Switch to ThinkNotes" in the header to jump to the ThinkNotes panel for the same question.
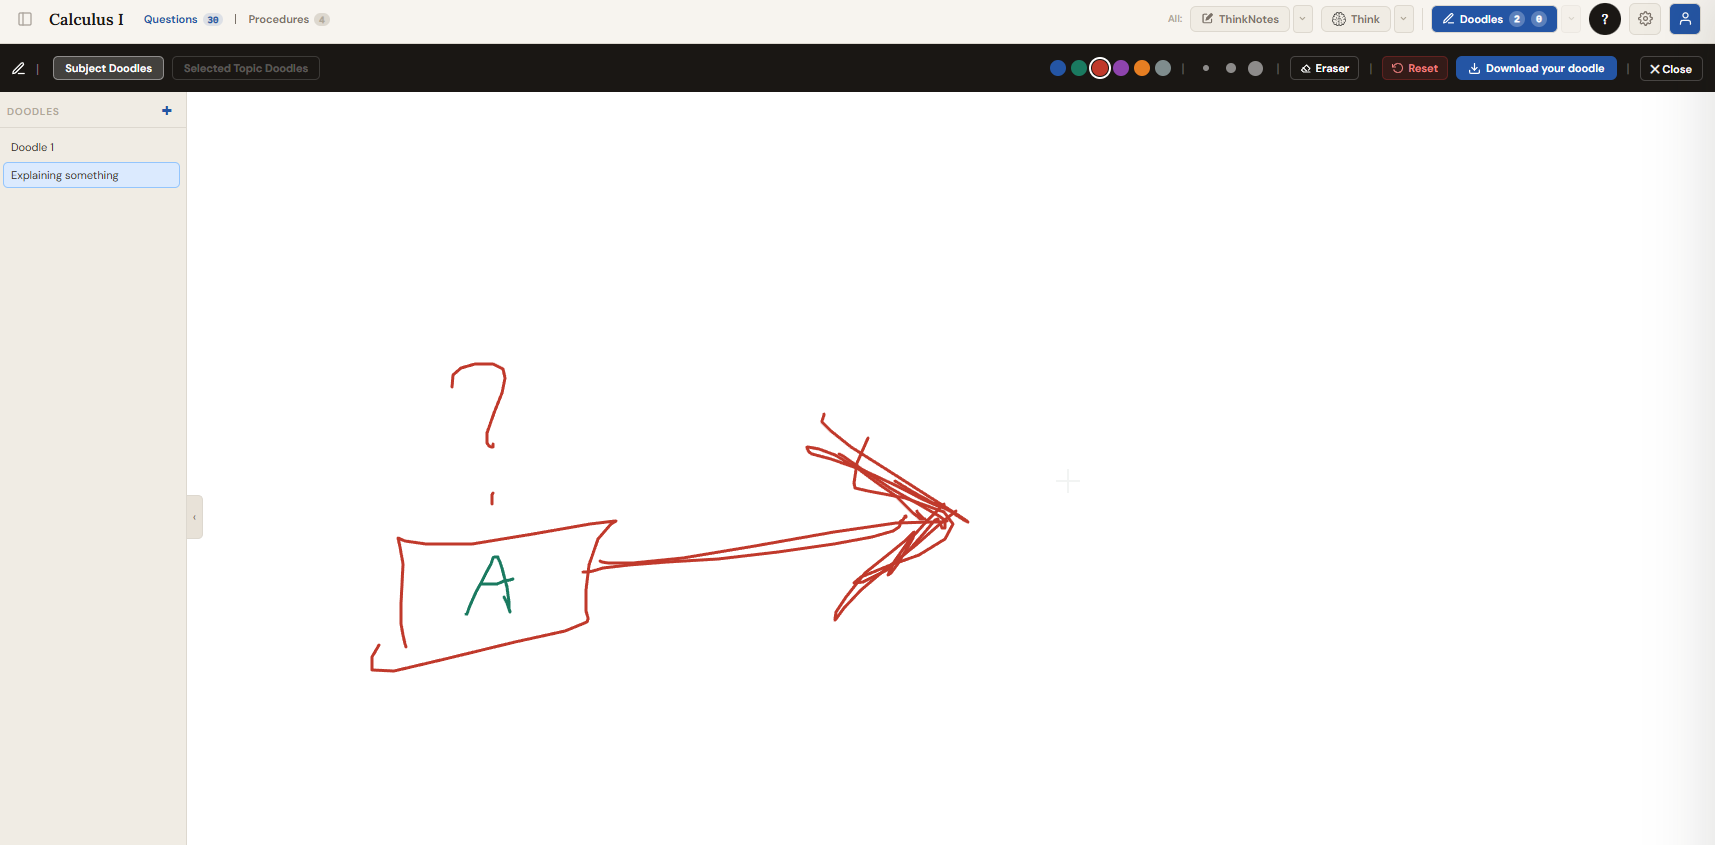
Doodle mode (Sketch)
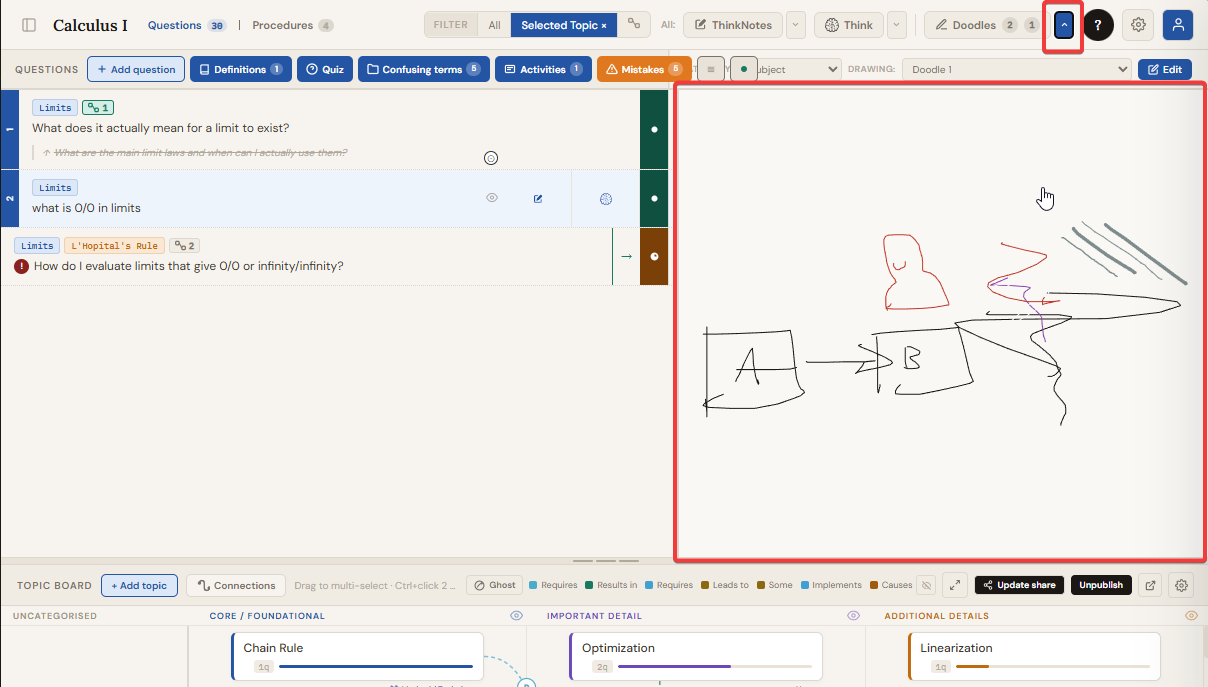
The Doodle button in the Questions header opens the doodle sketch panel. You can draw freehand diagrams, sketches, or visual notes linked to the currently selected question. Multiple sketches can be saved per question, organised by category and drawing name. The Doodle button and its ▼ arrow are hidden when ThinkNotes or Think focus mode is active.
The Doodle ▼ preview button opens a read-only canvas overlay over the depth columns. Use the Category and Drawing dropdowns in the header bar to switch between saved sketches for the current question without entering the full doodle editor.
Activities
Activities is a structured to-do system for your learning sessions. It lives between the Confusing terms and Mistakes buttons in the Questions header. Use it to plan and track what you are actually doing: reading, building, reviewing, testing. Unlike a generic task list, each activity can record the kind of mental effort it requires and map it to the specific concepts you are trying to understand.
Purpose: Structured practice and deep work. Add your learning activities below, attach concepts to each one, and link those concepts directly to questions you are working on.
Opening the Activities panel
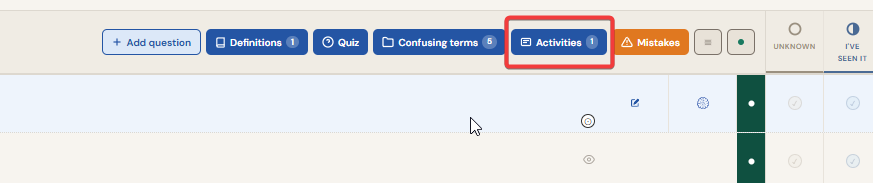
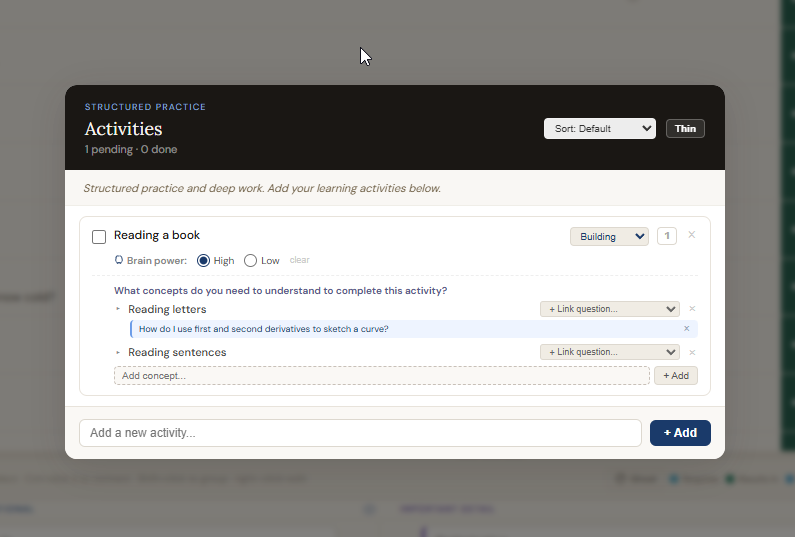
Click the "Activities" button in the Questions header. The panel opens as a modal. The header shows how many activities are pending and how many are done. A count badge on the button itself shows how many pending activities exist for the current subject so you can see at a glance whether you have things left to do without opening the panel.
Adding an activity
Type the activity name in the footer input at the bottom of the panel and press Enter or click "+ Add". Activities can also be pre-filled from any ThinkNotes or Think editor: select any text in the editor, right-click, and choose "Add as activity". The selected text is used as the activity name and the panel opens immediately.
Activity controls
Each activity row shows the following controls.
Concept chunking
Below the brain power setting on each activity is a "Concept chunking" section. It answers the question: what do you need to understand in order to complete this activity? Add as many concepts as needed using the text input and pressing Enter or clicking "+ Add".
Each concept has a "Link question..." dropdown. Selecting a question from the dropdown adds it as a linked reference below that concept. You can add multiple questions to a single concept by selecting from the dropdown again: each selected question appears as a separate blue chip below the concept title. The question text is fully readable and selectable. Click the X next to any linked question to remove it. This lets you map a concept to every relevant question without losing the connection between concept and question.
Panel display modes
The panel header includes two display options.

Adding activities from ThinkNotes and Think editors
Every rich-text editor in the app (ThinkNotes full-screen panel, Think depth check editors, and ThinkNotes top-bar accordion) supports "Add as activity" from the right-click context menu. Select any word, phrase, or sentence in the editor. Right-click. Choose "Add as activity". The selected text becomes the activity name, the Activities panel opens, and the new activity is pre-filled. This lets you turn a thought or insight from your ThinkNotes directly into a concrete task without losing context.
How Everything Connects
The sections communicate automatically. You never need to manually update the Topic Board based on what you do in Questions.
Learning Python inside Cinema 4D
You create a new subject called "Python in Cinema 4D". You click "+ Add topic" five times: Selecting objects, Traversing the object hierarchy, Creating and inserting new objects, Getting and setting object properties, Tags and their methods. All land in Uncategorised.
Selecting objects · Traversing the object hierarchy · Creating and inserting new objects · Getting and setting object properties · Tags and their methods
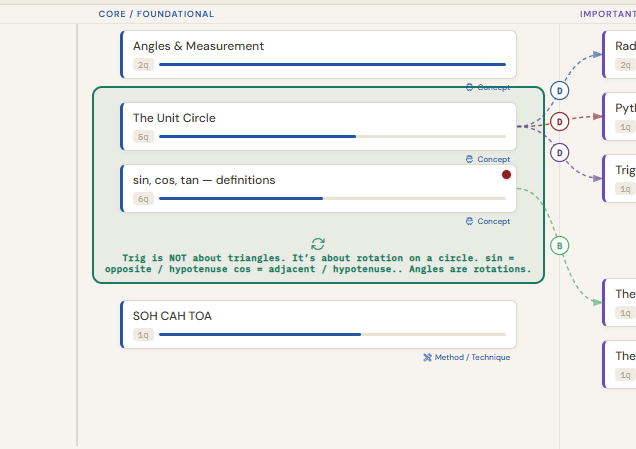
After reading, you drag "Selecting objects" into Core / Foundational. You drag "Traversing the object hierarchy" into Important Detail. You Ctrl+click both cards, choose "Requires" from the connection type dropdown, and type "You must be able to select an object before traversing from it." You click "Add connection". A curved arrow appears labelled "R".
You click "+ Add question" and type "How do I get the currently selected object?" linked to "Selecting objects". After studying, you find two methods: GetActiveObject() and GetActiveObjects(). The original question is now too vague. You add a sharper one: "When do I use GetActiveObject() vs GetActiveObjects()?" You drag the old question onto the new one, confirm the merge, and the old text appears as a strikethrough inside the new one.
You advance the merged question to I Can Explain It. You hover the question row and click THINKNOTES. A full-screen ThinkNotes panel opens. You write your understanding. You select the word "BaseObject" and click the Confusing button to flag it for later. You click "Switch to Think" in the panel header to jump to the full-screen Think panel.
Limits: You write "Both return None or an empty list if nothing is selected. Without a None check, the script crashes silently." You tick the Limits checkbox. It turns teal.
Mistakes: In the top editor you write "Using GetActiveObject() when the user has multiple objects selected." You click "+ Add mistake" and enter: text = "I used GetActiveObject() in my first script and silently ignored two of three selected objects", type = Understanding, severity = Would cause a problem. You right-click the mistake description text, select "Add as activity", and the Activities panel opens pre-filled with that description. The Mistakes check ticks automatically.
Apply: You tick "Used to solve a real problem". Apply turns amber.
Three checks are complete. The Upgrade button unlocks. You click it. The question moves to I Can Use It. The strength bar on the Selecting objects topic card updates automatically. The orange Mistakes button shows a count of 1, reminding you one mistake has not been marked resolved yet. You open the Activities panel and see the activity you added from the right-click menu. You set its context to "Building" and brain power to "High", add the concept "GetActiveObject vs GetActiveObjects" and link it to your question.
Learning Calculus Derivatives
You create a new subject called "Calculus". You add nine topics to Uncategorised: Limits, Derivatives, Integration, Functions, Rate of Change, Chain Rule, Product Rule, Optimization, Higher Order Derivatives.
After reading, you drag Limits, Functions, Rate of Change, and Derivatives into Core / Foundational. You Ctrl+click Derivatives and Limits, choose "Requires", and type "A derivative is defined as a limit, so limits must be understood first." You drag Chain Rule and Product Rule into Important Detail, draw "Supports" connections to Derivatives, and Shift+click Chain Rule and Product Rule to group them under a "Differentiation Rules" label with a green colour.
You add your first question: "What even is a derivative?" linked to Derivatives. After studying you advance it to I Can Explain It. But the textbook definition still feels disconnected from anything real. You add a second question: "What does a derivative actually mean in real life, not in math language?" After studying further, you find the car example. That question reaches I Can Explain It. You hover the row and click THINK.
Teach: You write "A derivative measures how fast something is changing at one specific moment." in the Teach editor. You tick the checkbox.
Scenario: You write a concrete car-journey example. You tick the checkbox.
Apply: You tick "Tested on a concrete example". Apply turns amber.
Two checks complete. The Upgrade button unlocks. You click it. The question moves to I Can Use It. You click the ThinkNotes ▼ button in the header bar to open the ThinkNotes preview overlay, use the arrow keys to navigate through your questions, and scan what you have written. The ✓ indicator on each question row confirms which ones you have already written ThinkNotes for. You open the Activities panel, add "Work through chain rule practice problems" with context "Building" and brain power "High", add the concept "Understanding chain rule application", and link it to your "When do I use Chain Rule vs Product Rule?" question.
Procedures
Procedures let you build step-by-step visual flowcharts for any process you are learning. Switch to the Procedures tab using the tab bar at the top of the Questions section. Each procedure is a separate flowchart with its own steps, connections, and layout.
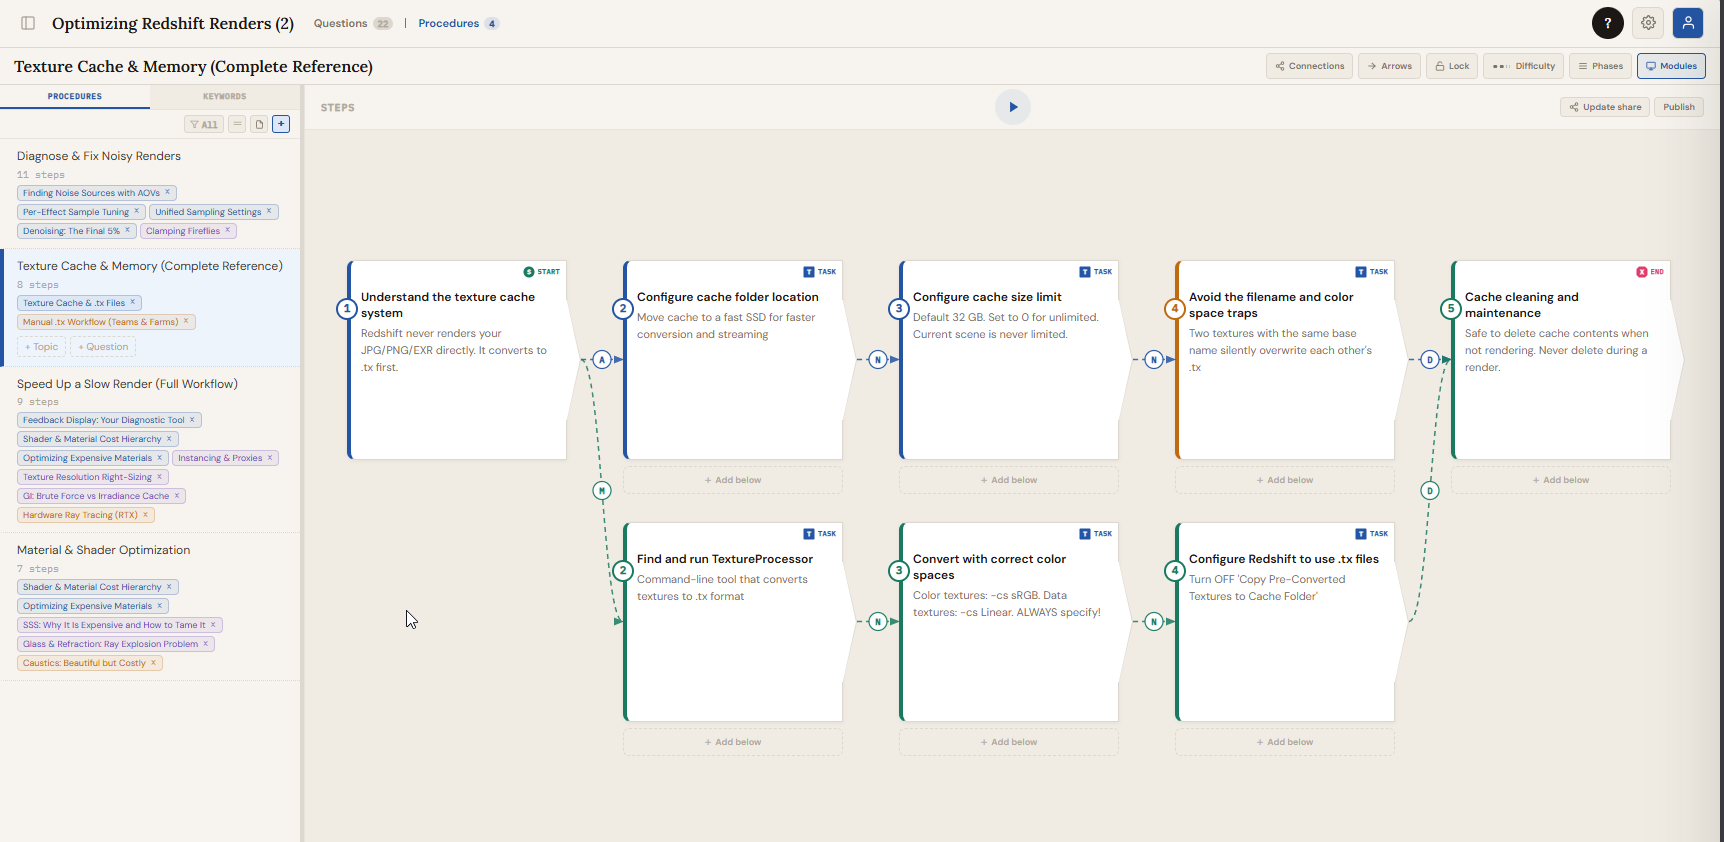
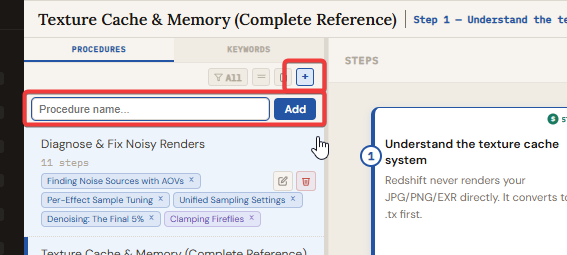
Creating a procedure
In the Procedures sidebar on the left, click the "+" button to create a new procedure. Give it a name. The procedure appears in the sidebar list. Click any procedure name to select it and see its canvas.
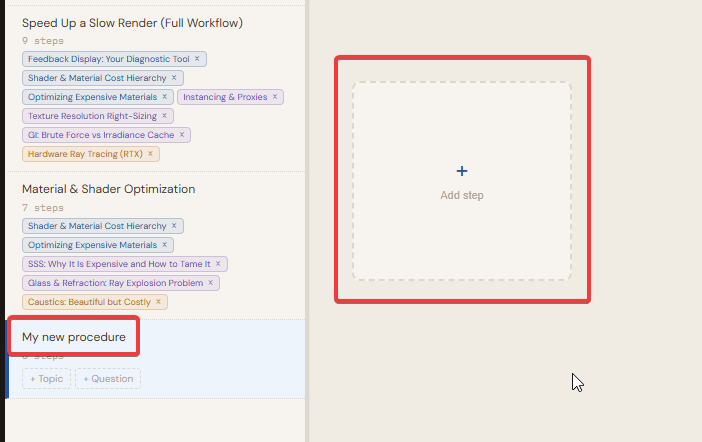
Adding steps
Click "+ Add step" at the top of the canvas, or click the "+ Add below" link that appears below any existing step. Each step is a card placed on a column/row grid. Steps can be one of several types:
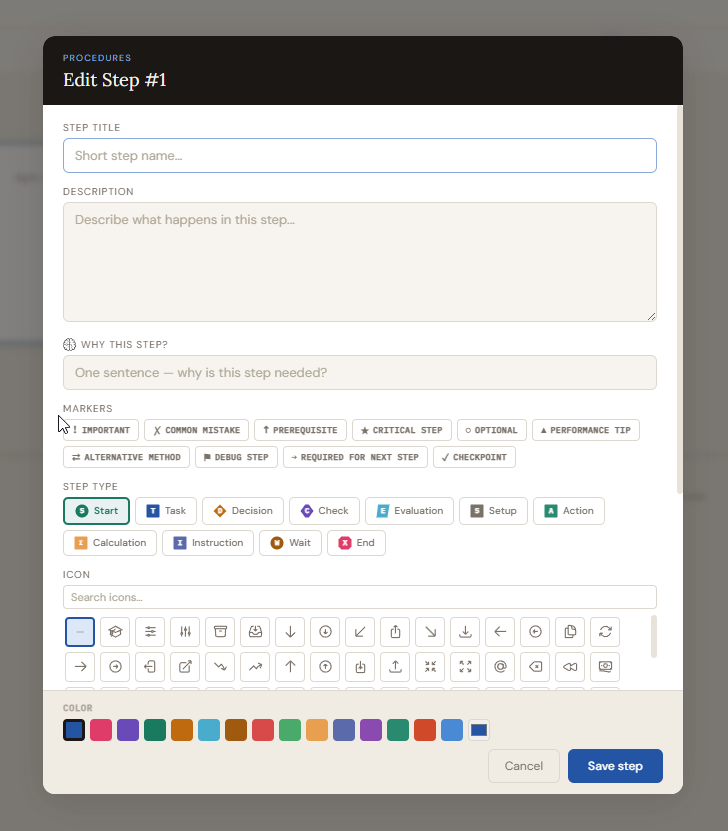
Click any step card to select it. The right side of the canvas shows the step detail panel with the title, description, colour, icon, type selector, and any attached modules.
Connections between steps
Steps connect to each other with arrows that show the flow of the process. Click a step's connection port (the small coloured circle at the edge of the card) and then click another step to draw a connection. Each connection can have a label, a colour, and a sentence describing the transition. Connection types work the same as topic connections on the Topic Board.
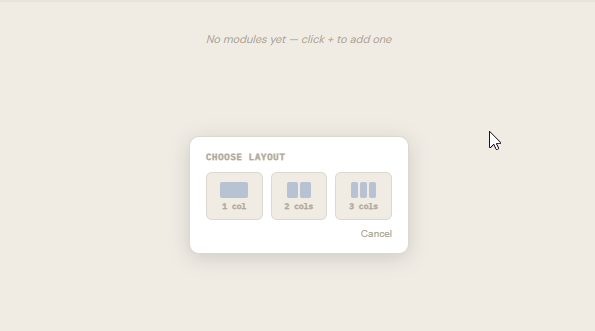
Modules
Each step can have one or more module rows attached to it. Modules are content blocks that hold study material, notes, or media directly on the step card. Click a selected step's "+ Add module" button to add a new row.
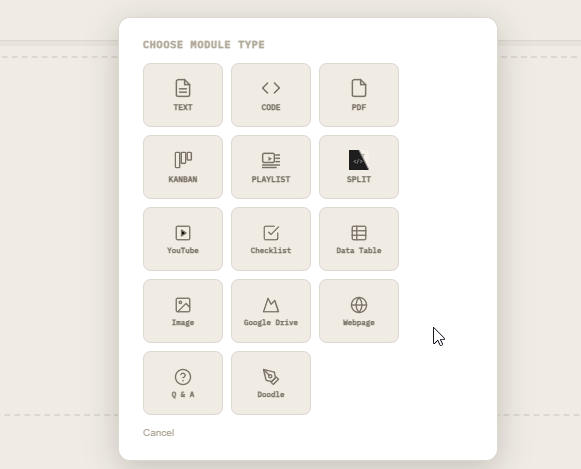
Each module row has one or more slots. Each slot can be one of the following types:
Click the gear icon on any module slot to open its settings panel (centred on screen). Click the x button on a module row to delete it.
Phases
Phases let you group columns of steps into named, colour-coded stages. Click "Manage phases" in the Procedures toolbar to create phases and assign them to columns. A coloured strip appears below the column headers showing which columns belong to which phase. Phases are shared across all procedures in the same subject. The column-to-phase mapping is stored per procedure since each procedure has its own column layout.
Keywords and the sidebar
The Procedures sidebar has a keyword section below the procedure list. Add keywords to tag and categorise steps. Keywords can have dividers between them to create sections. Drag keywords to reorder. Keywords are stored per subject.
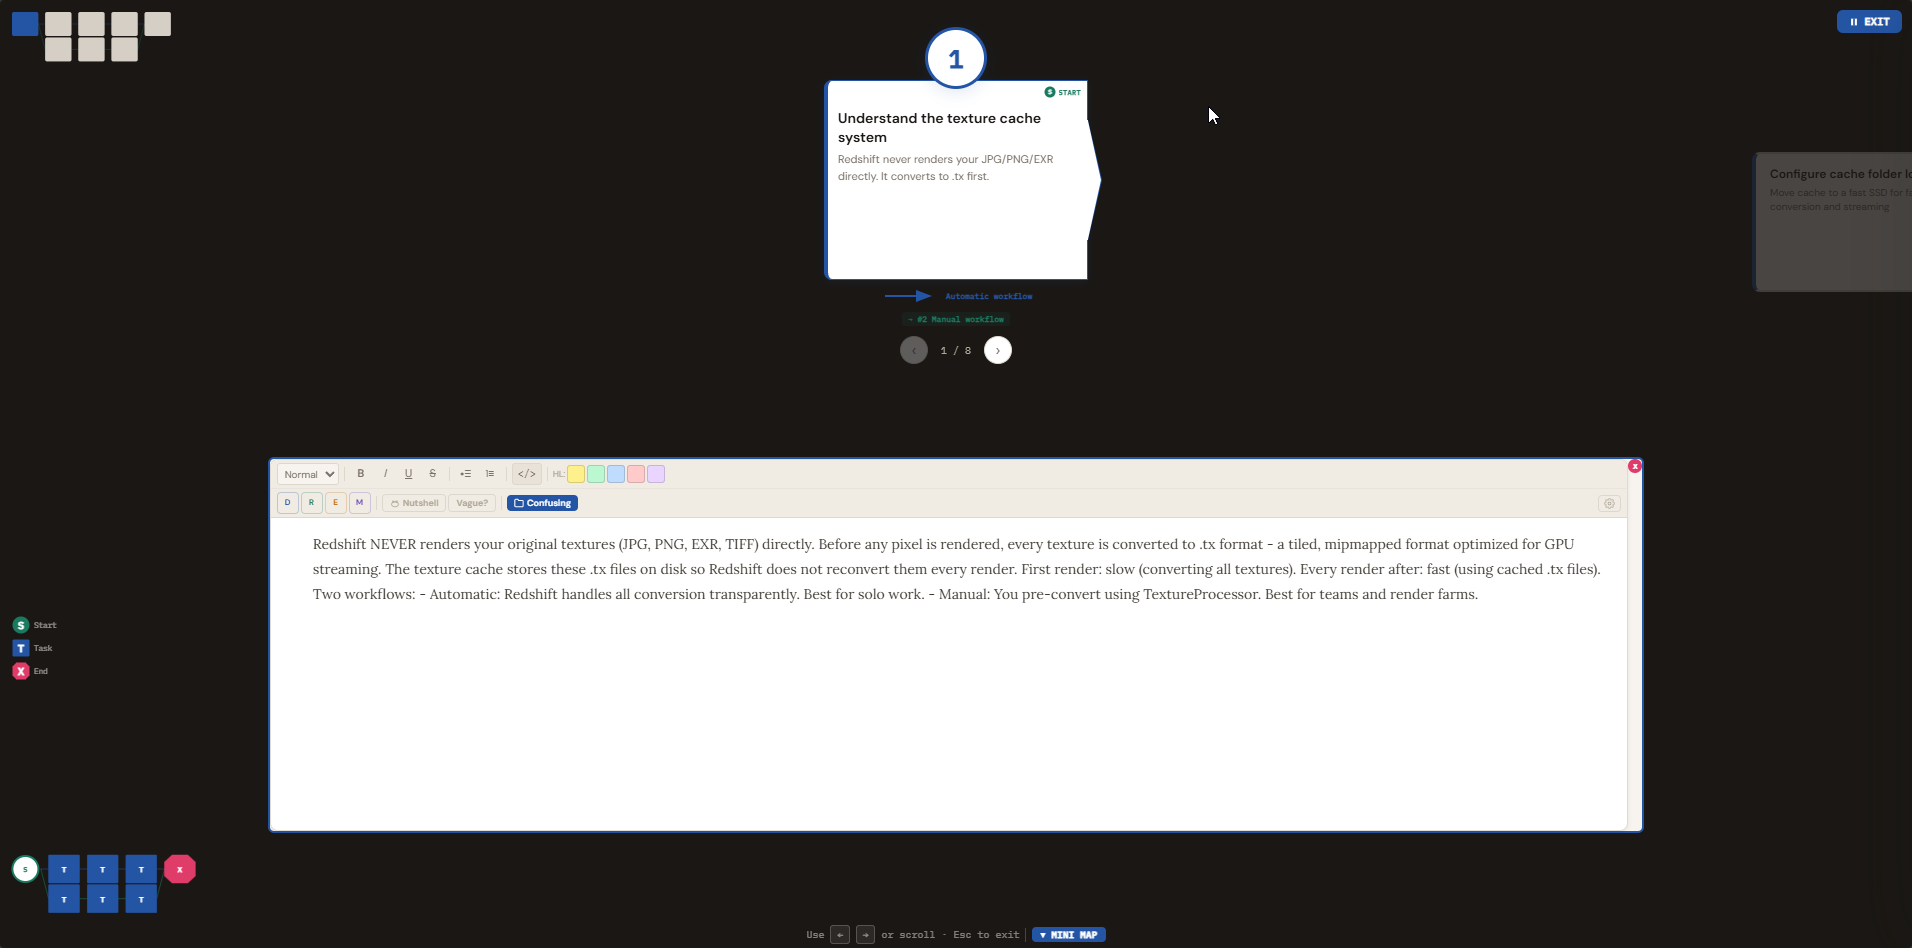
Minimap and Play mode
A minimap in the top-right corner of the canvas shows a scaled-down overview of all steps with their shapes and connections. Click "Play" to enter a presentation mode that steps through the procedure one card at a time with a dark overlay. Use arrow keys or click the navigation buttons to advance.
Importing a numbered list
Click the "Import list" button in the Procedures sidebar to paste a numbered list. Each numbered line becomes a step. In complex mode, the first line of each item becomes the step title and remaining lines become a text module on that step.
Definitions
Definitions let you build a per-subject glossary and link defined terms directly into your ThinkNotes.
Creating definitions
Click the "Definitions" button (book icon) in the Questions header bar to open the Definitions panel. Click "+ Add definition" to create a new entry with a term and its definition text. Definitions are scoped to the current subject.
Inline definitions in ThinkNotes
In any ThinkNotes editor, select a word or phrase, then click the "Def" button in the toolbar. A popup lets you choose an existing definition or create a new one. The selected text is wrapped in a dotted underline. Hover over it to see the definition in a popup without leaving the editor. Toggle the "Definitions" button in the toolbar to hide or show all inline definition markers.
Attached questions
Right-click a paragraph in the ThinkNotes editor and select "Attach question". A search dropdown lets you pick any question from the subject. A blue "?" icon appears in the left gutter at that paragraph. Hover the icon to see the question text and its answer preview. Right-click the icon to remove the attachment.
Paragraph connections
Right-click a paragraph and select "Add connection from here". A blue banner appears at the top of the editor. Click a second paragraph to complete the connection. A panel opens where you choose a connection type, description, and colour. Connection labels appear as pills in the left gutter below the source paragraph. Hover to see details and jump to the target paragraph.
Deep mode
Right-click a paragraph and select "Add to deep mode". That paragraph gets a blue right-side border marking it as "deep" content. Toggle the "Big Picture" button in the toolbar to hide all deep paragraphs, showing only the high-level summary. Blue dots in the gutter mark which paragraphs are deep content.
Sharing and Community
You can share individual ThinkNotes or your entire Topic Board with others via a unique link. Shared content is a frozen snapshot taken at the moment you click Share.
Sharing a ThinkNote
Open any question's per-row ThinkNotes panel. In the header bar, click "Share". A unique link is generated. Click "Copy link" to copy it to your clipboard. Anyone with the link can view the ThinkNote in a read-only page with the same formatting, block labels, and definitions.
Sharing a Topic Board
In the Topic Board section, click "Share board" in the toolbar. A unique link is generated for the board snapshot including all topics, connections, groups, and topic notes.
Publishing to Community
After sharing, click "Publish" to make the shared note or board visible on the /community/ page. Choose or create a category for your published content. Published items can be found and viewed by anyone visiting the community page.
Export and Import
Click the gear icon in the top-right of the subject header bar to open the export menu. The menu shows which subject is being exported.
Export (.json)
Saves a complete machine-readable backup of the current subject as a
Import (.json)
Restores a previously exported
Print summary (.txt)
Downloads a human-readable
Writing a custom JSON file
You can write a